I‘ve been a cord cutter for several years now.
What’s a cord cutter?
A cord cutter is someone who forgoes an expensive traditional service (like cable TV or home phone) in favor of an alternative Internet or wireless based service.
We’ve saved hundreds of dollars by switching to alternative services, but one thing that was tough when I first cut the cord was figuring out how to manage all of my disparate video streaming services, ripped DVDs, DVR recordings, TV shows, movies, music, photos and other media.
I wanted to have one interface where I could view and manage all of my media. It also needed to be easy enough to use that anyone in my household could catch on quickly.
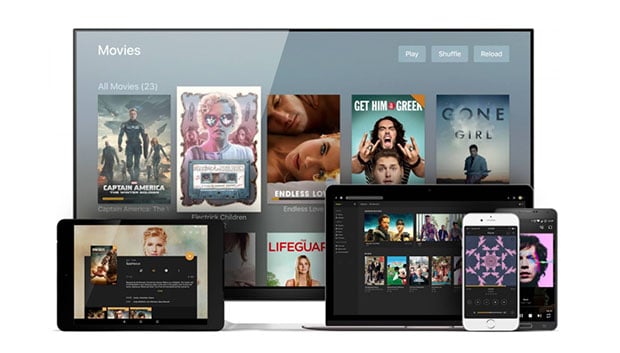
Soon after I started my search I discovered a software called Plex. It is a one stop hub for all of your music, photos, TV shows and movies. The software will serve your media to just about any connected Android or iOS device, web browser, game console or other device.
So let’s take a look at Plex, and talk about how it can become an integral part of anyone’s cord cutting package.
Quick Navigation
Cutting The Cord – Options
Cutting the cord these days is easier than ever. There are a plethora of free and low cost cord cutting options available to people these days. Some of them include:
- Over-the-air television: Of the top 100 TV shows, 94 are available via over-the-air television using an antenna and a digital tuner. If you don’t watch much TV, a turner and an antenna may be all you need.
- Over-the-air DVRs: If you want to record your favorite shows or entire series like you did with your cable TV box, there are quite a few over the air DVRs available. Some like the ChannelMaster have no ongoing cost, while others have minimal monthly fees. My current favorite besides Plex is the Tablo TV DVR.
- Streaming video sites: If the over-the-air broadcast TV options aren’t enough, the last couple of years have seen a number of good streaming services pop up. Among the best are Netflix, Amazon Video, Hulu, Philo, Playstation Vue, FuboTV and Sling TV.
- Streaming devices: Streaming devices like the Fire TV, Apple TV, Roku Ultra and others offer a great way to view your content on your big screen TV.
- Online DVRs: PlayOn is tops in my book when it comes to recording online video streams from all of your favorite services. Other services like Pluto TV do a limited version of recording live streaming shows.
- Streaming media hubs: There are several highly recommended media hubs, but the one we’re talking about today, Plex, is my favorite.
When you’re cutting the cord, there are a lot of options for content, devices and software. For a full discussion of setting up your cord cutting package, check out my post on the topic:
Plex Media Server
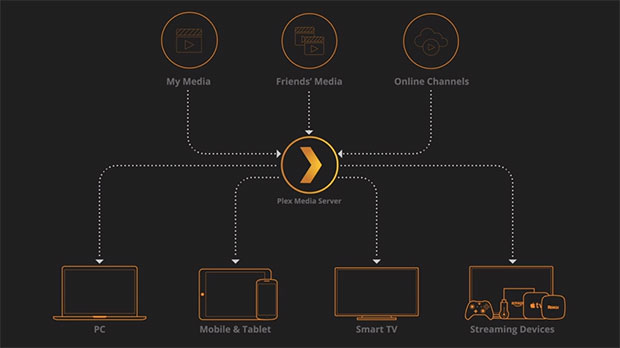
At it’s most basic Plex is a home entertainment hub that organizes and then serves your content from your computer, NAS or other server device, to your big screen TV, phone, game console or tablet.
Here’s how Plex describes their software:
Plex is like mission control for your personal media collections. With our easy-to-install Plex Media Server software and your Plex apps (available on all your favorite phones, tablets, streaming devices, gaming consoles, and smart TVs) you can stream your video, music, and photo collections any time, anywhere, to any device.
Plex is mission control for your personal and online media, and once you set it up and add your media, you’ll be ready to blast off!
Watch All Of Your Media In One Place
Whether it’s listening to your music library, watching your favorite movies or bingeing the last season of your favorite show, you can do it all through your Plex app – on whatever device you’re on.
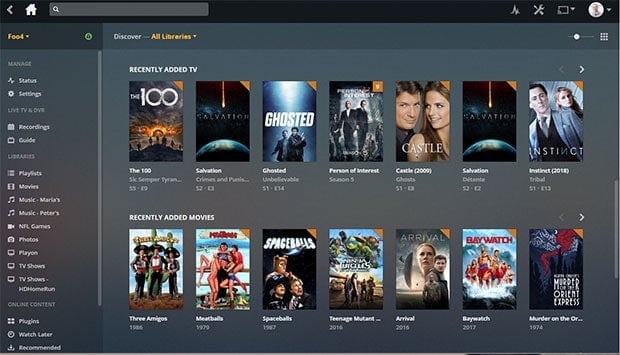
The Plex experience looks different depending on what device you’re on, but the basics are the same. You go to the home screen in your app where you’ll find a listing of all of your Plex libraries for different types of media.
In my Plex server I have libraries setup for TV shows, movies, music and photos. To view a certain library and media type you just select it from the navigation and you’ll be taken into the library for that media type.
Once you’re in a library you can view all of your media, and filter what you see by any number of different filters. For example, if you’re in your “TV Shows” library, you can filter the shows by title, year, air date, critic rating, content rating, last episode added, date added and more. You can even search for shows with a certain actor, writer, director or from a certain network. It’s extremely flexible. If you prefer, you can just search in the search box for a certain item.
When you add media to a library Plex will download the meta information about that media. For example, for movies it might download content ratings, reviews, trailers, Rotten Tomatoes scores, cover art and more. For music it will fetch the cover art, track listings, extras, lyrics and more. It will make sure that all of your media has a ton of rich information added to the database, and it makes it look pretty in the Plex interface.
Setting Up Plex
Setting up the Plex Media Server was pretty simple, although adding all of my various media libraries, adding a tuner and more took a while the first time.
The Plex server is currently available on these operating systems.
- Windows
- Mac
- Linux
- FreeBSD
- Various NAS Devices
- Nvidia Shield
Since I use it on Windows, here’s what you need to do to set it up on a Windows machine.
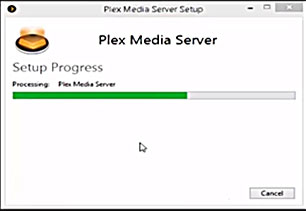
First, download the free software from Plex.tv.
- Second, click on the installer and follow the prompts.
- When complete, click on the “launch” button to start the Plex server. You should then see a Plex icon in your system tray. Double click on it to open the user interface.
- Plex will open in your web browser and show you a “Get Started” screen, where you can give your server a name (so you can recognize it when connecting).
- Next, you can choose to add your media libraries, whether it’s music, photos, video or other content. Just select the folders where your media lives for each library.
- On the next step it will ask you if you want to add any “channels” to Plex. Channels are essentially plugins for online content and media content that get added onto Plex. You can add channels for things like Apple Movie Trailers, Podcasts, Soundcloud and more. I have one added on for my Tablo over-the-air DVR.
- Once you’ve added any channels you want to include, you can click on the “Done” button to complete the process, and your server will be set to go.
Once your server is setup Plex will take you to your main Dashboard for all of your libraries, the home screen.
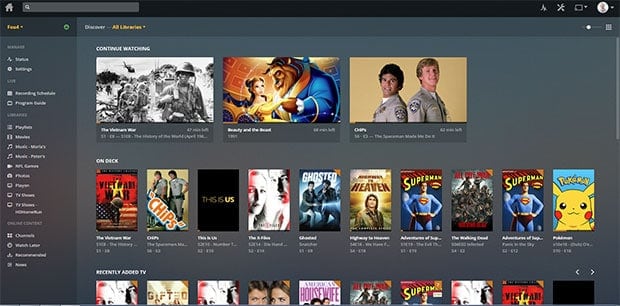
On the home screen it will have several different rows of content. There are rows for “Continue Watching” so you can pick up where you left off on a show or movie, “On Deck” to watch the next shows in a series that you have started watching, and then it will have “Recently Added” sections for photos, TV, movies, home videos and music. You can also click directly into a particular library from the navigation on the left if you want to view only a certain type of content.
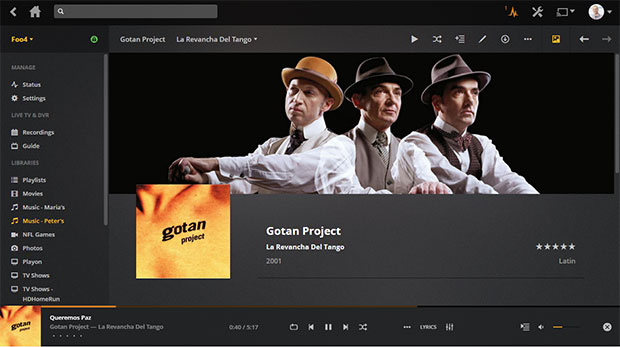
To watch a TV show, movie or listen to music, you just hover over the content and you’ll see a circular play button. You can click on that to quickly play the show, or you can click elsewhere on the content to go into a detail page about that particular show, movie or album. For example, here’s an album detail page:
Before we get too far, let’s take a closer look at setting up your media libraries.
Setting Up Your Media Libraries
If you didn’t setup all of your media libraries when installing your server, you’ll need to do that now.
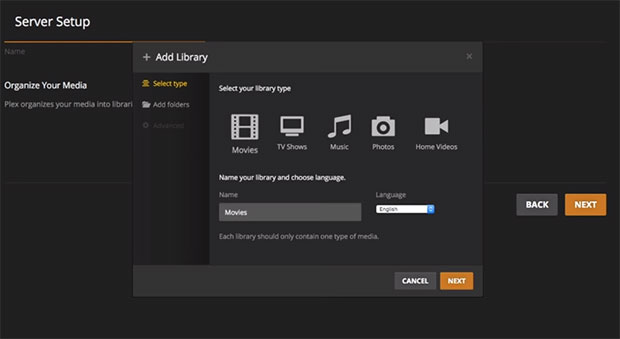
On the home screen of Plex you’ll see a column heading for “Libraries” in the left navigation. If you hover over that with your mouse you will see a “+” button. Click on that button to add a new library and you’ll see the screen below.
To add your library, first choose what type of content you’re adding. In most cases you’ll be adding movies or TV shows, but you can also add music, photos and home videos.
Depending on what type of media you choose, your content will be scanned and the system will try to download extras for your content including movie posters, plot summaries, reviews from Rotten Tomatoes or IMDB, trailers, cast biographies and more.
After choosing which media type you’re adding, you name your library. I just name mine by content type, but if you have special or separate libraries for your spouse or kids, you can make a descriptive note of what the library is in the title.
Next, you click on the “Add Folders” button to add the folders on your computer that you want to be scanned for media. You can add as many folders as you want, if for example, your movie collection is spread over three different hard drives. Plex will then regularly scan those locations for new media.
Finally there are some advanced options that you can setup based on what type of content it is. Some advanced features and functionality may only be available if you pay for the premium “Plex Pass”.
Free TV Shows And Movies Via Plex
Plex recently added a new feature to their software, the ability to watch free ad supported TV shows and movies via their apps.
To view them you just go to the link in your app for “Movies & TV On Plex”, and you’ll be able to view a selection of free movies and TV shows, just as if they were in your own library.
The only catch? The content is all ad-supported so you’ll have to watch commercials while watching your chosen content. It’s similar to other free streaming services like Pluto TV, Sony Crackle, and others where you still view ads.
Also, while there are some pretty decent movies in there, a lot of them are B movies, or older movies. There are not many really new releases.
Watch, Timeshift And Record Live Over-The-Air TV
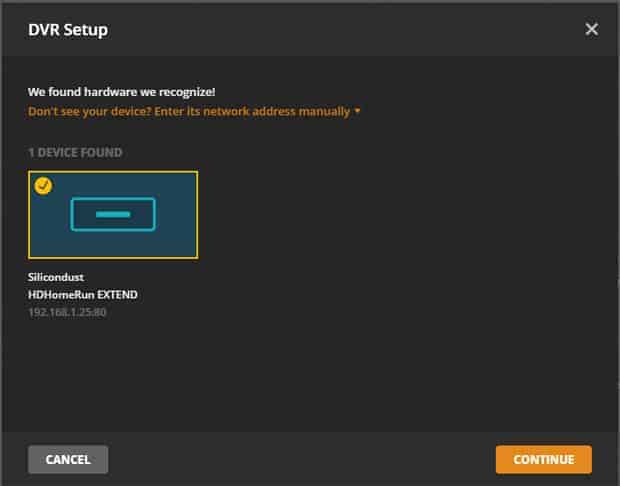
One feature that Plex has added recently is the ability to add a network over-the-air TV tuner to your system. Once you add a tuner you can watch and record live broadcast TV via Plex!
I use Plex for live TV in conjunction with my HDHomeRun Extend tuner. (Read a full HDHomeRun review here)
I’ve used other over-the-air DVRs in the past few years, but the one that Plex has now released is one of my favorites because it not only gives you a free program guide for all of the broadcast channels (while most other providers will charge an additional guide subscription fee), but it also allows you to record your shows, remove commercials and then curate your TV or movie libraries.
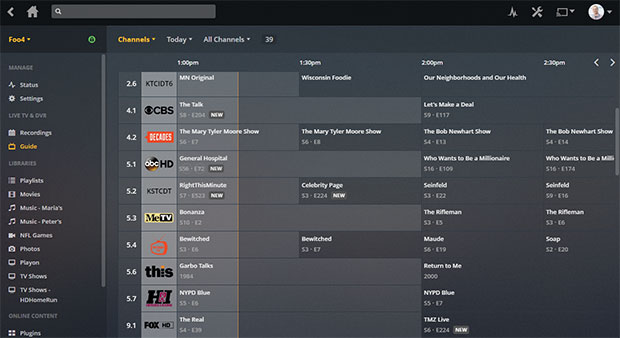
Plex also recently released a live TV grid guide, similar to what you’d see with your cable TV box so you can see what’s currently on, watch live TV or set it to record a show.
From this familiar looking grid you can hover over a show and the live shows will show both a “Play” button and a circular “record” button. Future shows will show only a “record” button.
You can either watch the live shows now, or set it to record for future viewing.
Recording Shows
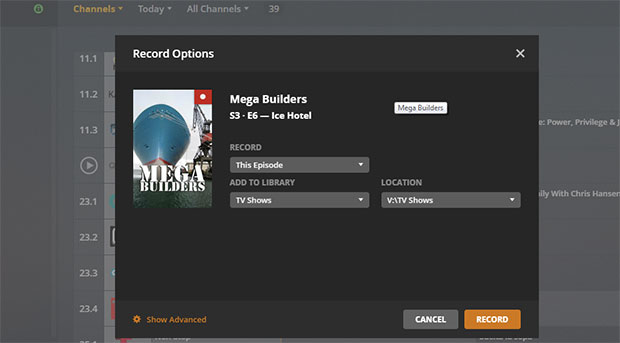
Recording shows in Plex is extremely easy. You just select the show or movie that you want to record, click on the “record” button, and then the following box will pop up.
On this screen you’ll just select if you want to record only this one episode of this show, or all episodes. Then you choose which library the media should be added to, and which folder it should be saved to. Lastly you hit the “Record” button to record the show.
If you want, you can click on the “Show Advanced” button to look at additional options for recording your show.
Advanced options include telling Plex what resolution it should record, whether higher resolution recordings should replace lower resolution older recordings, whether or not to allow partial recordings if a show is already in progress, how early and late to start the recording (so you don’t miss any of it), what channel it should record from, what airing time should record, and finally, whether it should remove commercials.
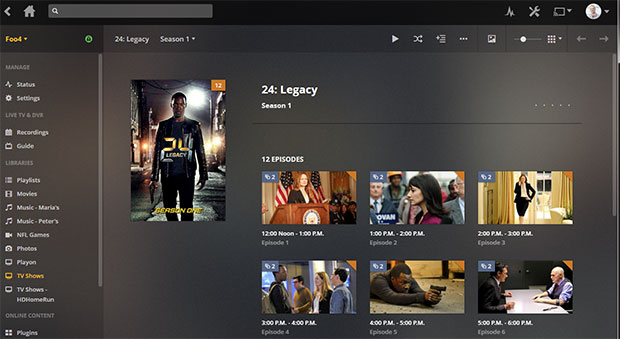
Once a recording is set it will automatically record your show at the allotted time and add it to your library. TV show posters, theme music, cast and more will automatically be downloaded and added to your library.
Removing Commercials
As mentioned above Plex can remove commercials from your content if you want it to. I’ve turned this on by default for all recordings and it works pretty well. I love having this option, no more commercials!
To turn on this functionality you would just go to the DVR settings and check the box to “remove commercials”. You can find it at “Settings > Server > Live TV & DVR > DVR Settings >Remove commercials”.
While having this functionality available is awesome, it should be noted that it does have a couple of caveats.
First, it doesn’t always detect the commercials with 100% accuracy, which means it can remove portions of your show inadvertently.
I’ve found that shows on at least one network in our area have problems detecting commercials correctly, so on that network I don’t have it remove commercials on the shows I record. I leave them as is.
If you’re adventurous there are ways to modify how the program detects commercials, and you can try to tweak it, but that’s beyond the scope of this article.
Another downside is that removing commercials from recordings can take a while and cause high CPU usage while it does. If you’re on a slower machine, or running multiple consecutive recordings, it can cause issues, so beware.
Plex Apps For Viewing Content
Once you’ve got Plex setup and serving content, you can now start viewing your content on a variety of different platforms.
First, you can just watch your content in a web browser on your computer where the server resides. Just click on the Plex icon in your system tray and it will launch the web interface.
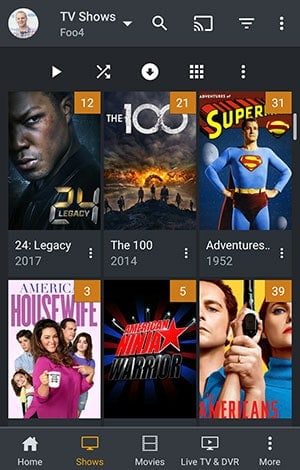
Currently there are apps available on these platforms:
- Windows
- Mac
- iOS
- Android
- Android Auto
- Android TV
- Fire TV
- Apple TV
- Chromecast
- Playstation
- Xbox One
- Roku
- Amazon Alexa
There may be some additional apps or plugins that I’ve missed, but the major ones are listed above.
I currently use the app on my Fire TV, my Android phone, Xbox and via the web. On all the platforms the Plex interface is beautiful, and functions exactly as it should.
If you use the apps on your phone or tablet, you have the ability to sync your favorite shows or movies to your device as well. That can come in handy if you’re going on vacation for example. You can download an entire season of your favorite show to your device, and then watch it on the go, even when you have no Internet connection.
On the phone you can also set it to automatically upload your photos to the photos library on your server when you’re connected to WiFi. That means you won’t have to connect your phone to download photos anymore.
Sharing Your Content With Friends
If you have friends who also have a Plex account, you can add them as authorized users on your server, and then they’ll be able to view your content.
To add a friend you just go to “Settings > Users > Friends > Invite Friend” and you can invite them to view your content using their email or Plex username.
Once they accept the invite your server will show up in their server dropdown on the homepage, and they’ll be able to view whichever libraries or content you give them access to.
When inviting your friend you can limit their access however you want. If you only want them to be able to watch your movies, restrict it to your movies library. If you’re sharing the movies with a younger family member, you can restrict it to only G rated movies.
I’ve tried this functionality out by sharing servers with a friend, and it works well, as long as your friend’s server also has a strong Internet connection.
How Much Does Plex Pass Service Cost?
There are a couple levels of service with Plex, but the basic software is a free product, and you can download and try it out at any time – at no cost.
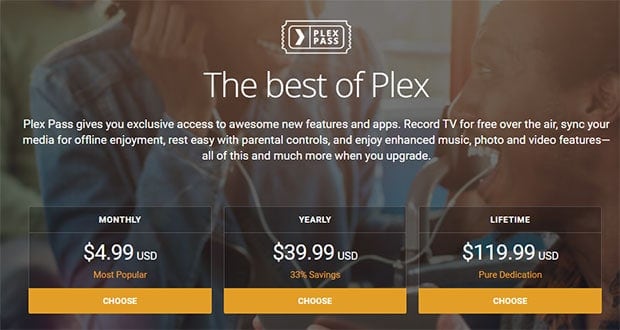
The free software does have limitations, however. You only get premium features like watching or recording free over-the-air TV shows, the ability to sync your media to your devices for offline viewing, parental controls and more when you pay for a subscription. For me a subscription was a no brainer and I paid for a lifetime pass (which was $149.99 at the time) years ago. Thankfully the prices are a bit lower these days.
Plex Pass Subscription
Paying the cost for the Plex pass subscription carries the following monthly, yearly or lifetime cost:
- Monthly: $4.99
- Yearly: $39.99
- Lifetime: $119.99
I recommend just buying the lifetime license if you think you’ll use the software for more than a year or two. I’ve had it for 4-5 years now, so I’ve definitely gotten my money’s worth. If you’re not sure, try it out for free first, and then try a monthly pass at first. You can always upgrade later to a lifetime pass.
Have you tried Plex? What did you think? Has it become a part of your cord cutting toolbox?



I been using plex for 2 years and yesterday my plex account got removed, so i contact support and they told me they can not tell me that type of information when i asked why i got removed, so i created a new account and not even 1 day i got removed again, what is funny the new account had only myself on it sharing the plex server and on facebook i still get no help, in the terms it says you can share it with the whole family but also plex can remove your account at any time for any reason. I was just sharing my desktop that had plex with family members and plex still today will not give me a answer…….. I switch to emby and it does work better with playback then plex i would give emby a try forget about plex
plex is a waste of time and money. I bought a lifetime plex pass and sharing my plex server with family and friends now thr plex team has been blocking my account. only answer I get is that I been accepting money for plex and that is not true. I asked even for my money back and the support told me to get a lawyer. now everytime I create a plex account it gets banned the next day. very bad support and plex doesnt even run great anyways on all devices. they say they explained to me but not true.