A while back I did my first video for this site, a 30 second tip on how to make a budget. While the video was nothing special, it piqued my curiosity about doing video for my blog. I’m a pretty logical and by the numbers kind of guy, but doing video allows me to indulge my creative side. In the process it has also helped the site’s traffic and humanized me a bit to my readers I think.
I’ve now been doing video for a year or two now, and I thought today would be a good time to do a review of why I do video for my blog, what I think it adds to the site, and then walk everyone through how to put together a low cost blog video setup for themselves.
Quick Navigation
Why You Should Be Video Blogging
There are a lot of reasons why you should think about adding video to your blog resume.
- It will help you to connect with your readers: Having video on your site gives you a great way to connect with readers. It’s much easier for people to connect with you when they can see your face and look you in the eye.
- Certain topics work better with video: Certain types of posts will work better with video. For example, I do a lot of reviews on this site, but sometimes doing a walk-through of a website or software tool using video is a more effective way to get across what it’s all about.
- Video will help your average site visit time: When you have video on your site your time on site per visit will go up, which will help you in the long run in search.
- It will help your site’s SEO and search engine ranking: Forrester Research gave a stat that having a properly optimized video will give you a 53% better chance to get an organic first page link. I have seen certain posts on my site improve drastically in search rankings once I added a video on YouTube and on the post. I’ve also noticed that if you’re fortunate enough to get a page 1 link, often you’ll have two of them, one for your video, one for your blog post.
- YouTube is one of the highest visited sites on the internet, and one of the biggest search engines: Over 4 billion videos are viewed a day on YouTube, and they’ve got over 800 million unique users every month. If you were to consider YouTube a search engine, it would be the second most searched behind Google. So it pays to have your content on YouTube.
- If you sell something, you’ll get a higher conversion/sales rate with video: Video can drastically improve conversion rate if you’re selling something on your site. That’s why you’ll see so much video on sales pages online. It could also help conversions if you’re just trying to get people to sign up for your site’s email list, or something else that is free.
Put simply, having video on your site can help you in the search rankings, help build trust in you and your brand, and quite often video is just the best option for getting across the information you want your audience to hear. So now let’s look at some of the details about video blogging – what you’ll need in order to create and publish great looking videos.
What Video Camera Should I Use To Vlog?
There are quite a variety of video cameras that you can use these days for shooting video for your blog. You can use a webcam attached to your computer, a cell phone camera, or even a flip type camera or a DSLR. If you’ve already got something, it’ll probably work fine, but I prefer a camera that allows for an external microphone because your sound will be so much better.
Flip type cam: I currently use a Kodak Zi8 video camera for most of my blog videos. It’s small, easy to carry around, and has a jack for an external microphone (which I think is a must to avoid awful sound). That model is discontinued, but it’s predecessor is the sub $100 Kodak Playtouch.
- DSLR camera: I currently use a Canon T1i as well for some of my videos. As a DSLR it’s more flexible with the look and feel it can give your videos, and the videos can come out looking pretty amazing. The newer Canon T3i is probably better for blog videos, however, as it has an external mic and screen you can turn towards you while filming. If you buy a Canon camera this $100 50mm lens is great for blog videos. Key takeaways? Buy a camera that you like that will give you an external mic input and a screen you can turn towards you while filming.
Dedicated video camera: I don’t currently have a dedicated video camera (non-flip cam), so I can’t give great advice on buying one. Just do your research and find a highly rated HD cam. Here’s one sample list of highly rated camcorders at Amazon.
- Iphone/Ipad/Android Device: I know a lot of folks are using their Iphones, Ipads or Android phones and devices and their integrated cameras for their blog videos. In many cases the video can even be very good, especially on some of the latest devices with HD video. I can’t speak to this as I don’t currently have this option.
- HD Webcam: If you’ve already got an integrated webcam it may work just fine for your videos. Otherwise you can buy a nice HD webcam for relatively cheap.
The key things when choosing a camera to do your blog videos is to choose something that has good or passable video, and if possible find something that has an external microphone input so you can get good audio. Nothing ruins a nice looking video like poor audio. Here’s a more in depth discussion of what camera to use.
Microphones To Use
Here are the microphones I currently use to get better audio on my blog videos. One I use while sitting at the computer, and the other while I’m out filming somewhere.
Audio Technica AT2020 USB Mic: This is the mic I use when doing video at the computer. It’s plugs into the USB port and has amazing sound. Less than $100.
- Audio Technica ATR-3350 Lavalier Mic: This is a mic that plugs into my Kodak Zi8 and has a clip to pin it to my shirt while I’m out shooting videos. It gives the audio to my videos much better sound and a more professional feel. Around $20.
I’ve been extremely happy with both mics, and would recommend both.
What Software Should I use To Edit My Videos?
Depending on what platform you’re using there are a variety of software that you can use to edit your videos and enhance them with cool transitions, text effects, green screen and more. I won’t do an exhaustive list here, just mention the tools I have used with some success.
Sony Vegas Movie Studio: This is my main video editing software, and currently it can be bought for less than $50. It has a bit of a learning curve, but once you learn how to use Vegas, it’s a pretty flexible and powerful tool. It has some great features including advanced transitions and green screen so that you can do professional looking type studio videos.
- iMovie: For Mac users out there the software that came with your computer can be used to create some awesome videos for your blog.
- Windows Live Movie Maker: Microsoft’s free video editing software can do a decent job, although it can’t do some more advanced tasks.
- Whatever came with your camera: Many video cameras will come with a basic video editing software. If you don’t want anything fancy you can just use that to edit. You’ll probably want something more advanced down the line.
There are a lot of other free and premium video editing suites out there. If you don’t like the ones above, search around, read reviews, and find one that you think will be a fit for you and your needs.
Green Screen Setup
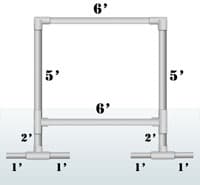
Later I decided that I wanted a portable green screen stand but found that a good one can cost quite a bit of money, sometimes upwards of $100-200. Instead of buying one I came up with my own DIY green screen stand using PVC pipe and connectors, all for around $12 at my local home improvement store. Here’s a look at how it was done: (Create Your Own DIY Green Screen Setup)
You’ll need good lighting to do green screen correctly, so I purchased a couple of bright work lights and a clamp light or two at my local hardware store. Total cost of around $38.
Here’s an example of one of my early green screen videos (I was still working on getting the lighting right):
Doing Screencasting Videos
Screencasting is where you record what you’re doing on your screen on your computer. This type of video works well for doing reviews of websites, software or for doing step by step tutorials of how to do something.
In the few screencasts that I’ve done, here is the software that I use.
- CamStudio: This is a free open source software that you can use to do screencasting videos. You just tell it what area of the screen you want it to capture, and whether or not to capture audio as well. It outputs an .AVI file when you’re done. Free and works well.
- Jing: Another screencasting tool I’ve seen people use.
- ZoomIt: A great presentation utility that allows you to type text, draw on or highlight parts of your live screen, including over video. I’ve used this several times while doing screencasting reviews of websites and software to highlight or point to parts of the screen for the video.
Here’s a link to a Wikipedia comparison of screencasting software.
Here’s an example of a screencast I did recently for a review of a budgeting software:
Doing A Virtual Whiteboard
Along the lines of doing a screencast, another effective tool can be to do a virtual whiteboard. I came upon the idea in a post from Pat Flynn where he gives a full tutorial on how to create your own virtual whiteboard.
How does it work? Open a background graphic in your favorite image editor (like Photoshop or GIMP), start your screencasting software (see above) and then draw or write on the image to help illustrate a point in a more engaging and interesting way. Here’s a video showing how Pat does it:
Here’s an example of a virtual whiteboard that I did recently:
To make your video look it’s best you’ll need some sort of a drawing or writing tablet. I use this one from Wacom for my videos:
Conclusion
Doing video for your blog is a great idea because it can better allow you to engage with your readers, can help you rank better in the search engines and open you up to a whole new traffic source from some of the highest trafficked sites on the internet like YouTube.
Doing video for your blog doesn’t have to be expensive, and many people already have most of the tools needed in order to give it a go. Building up a blog video toolset can also be done over time, so you can wait to buy more advanced or expensive tools later on when you’ve decided that vlogging is for you. So why not give it a go?
Have any tips for what cameras are the best to buy, what software to use when editing, or anything else related to vlogging? Tell us in the comments!
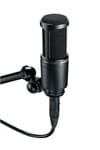 Audio Technica AT2020 USB Mic
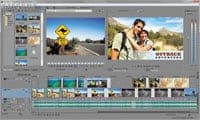 Sony Vegas Movie Studio

Nice post! I’ve been doing video blogging, blogging, and podcasting. But I am considering putting together my video blog and podcast together to save work. I have a MacBook Pro and I have Real Player converted. So what I do it after I do video blogs I just convert them to MP3 podcast, upload them to my blog and podcast host (which puts them on iTunes for download). On top of that the transcripts are written in Word Doc, converted to PDF and both are uploaded. If I make my videos on Keynotes, I convert that in to MP3, PDF (like a powerpoint) and have that uploaded. And all of this might be on one blog for people. So on one blog post they get:
A video blog
The written blog
A word doc transcript of the blog
A PDF of the blog
A PDF Powerpoint (IF the video was made on KeyNotes).
Plus the MP3 attached for download or they can play the Podcast on the blog.
Do you think I am overdoing it? And should I combine one or two of these together, like I suggested making the podcast and video one?
Thanks!
Ricardo
I have not tried video blogging yet but I have done and edited some personal videos. I use my point-and-shoot camera because it has video capability. I have a headset with mic and a special software for voice recording. For editing, I use Windows Live Movie Maker.
Pete,
This is a great run down of all the tools to use. I’ve done a couple videos, but I definitely struggle with it still. I really want to do some screen casts. So, I will definitely be bookmarking this page to come back to. Thanks!
Glad you found it helpful Hank!
thank u for info